System Recordings
Search Knowledge Base by Keyword
Creating a System Recording
System recordings are used to record and upload messages that can then be played back to callers at any step in the call routing workflow. Named recordings can linked to workflow components such as IVR (digital receptionist), announcements, queues, ring groups, follow me, etc… Linked recordings will be played back when the caller is routed into the given workflow step.
For example, you might create a recording called “Main Menu” and then play that message in an IVR before a caller is asked to make a selection. Or, you might record a recording called “Holiday Message” and then use that message in an Announcement. You would then route incoming calls to the Announcement or IVR using the Inbound Routes configuration.
To create a new System recording click on the ![]() button from the admin menu. The add recording page will look image below. Existing system recordings can be edited by selecting from the list on the right.
button from the admin menu. The add recording page will look image below. Existing system recordings can be edited by selecting from the list on the right.
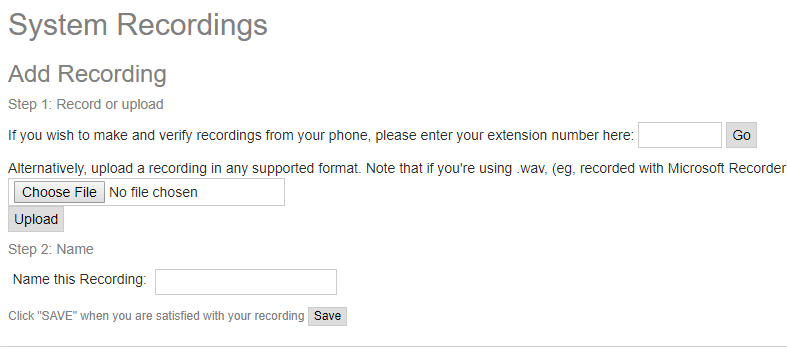
InfoFloTalk offers two ways to create system recordings, either by using the user’s phone or by externally recording an mp3 file. When recording its optimal to keep the talk time under 60 seconds so the file is not too big.
Create system recording using the phone
- From the system recordings page, enter your extension and press the Go button
- Dial *77 as instructed by the system, wait for the beep and start recording. When done recording hangup.
- dial *99 to listen and verify the recording, if you wish to re-record, hangup and dial *77 again
- After verifying the recording, fill in a name (no spaces or special chars are permitted), and press save.
- The recording will display as a new entry on the list on the right.
Create a system recording using a pre-recorded file
- Pre-record voice using a voice recorder on your smartphone or get a professional scripted recording from a third party. Make sure the recording is in mp3 format.
- go to https://audio.online-convert.com/convert-to-wav and drop the recorded file from (1) in the green area in the center of the page
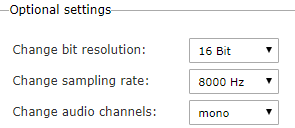
- from the optional settings section change the values as follows as in the image below:
- Change bit resolution – 16Bit
- Change sampling rate – 8ooo Hz
- Change audio channels – mono
- Click Start conversion which will download the file locally
- Click the “Choose File” button and select the converted file. Click the upload button to upload the file
- Fill in a name (no spaces or special chars are permitted), and press save.
- The recording will display as a new entry on the list on the right.