Setting up Bria Solo
Search Knowledge Base by Keyword
Steps to setup Bria Solo and connect to InfoFloTalk
Bria offers a cross platform softphone product that can be configured once and run on any device. The product comes in different flavours ranging from a free version all the way to a enterprise call center version where an admin can centrally manage all VoIP accounts. All versions of Bria will work with InfoFlo Talk. For a complete product comparison please click here
Install Bria
The product requires an online registration, please click here to get going.
Setting up Bria Solo (single user)
Setting up a VoIP account
- Login to your new account and click on the
 icon from the top menu
 - Click on the
 button to add a new connection
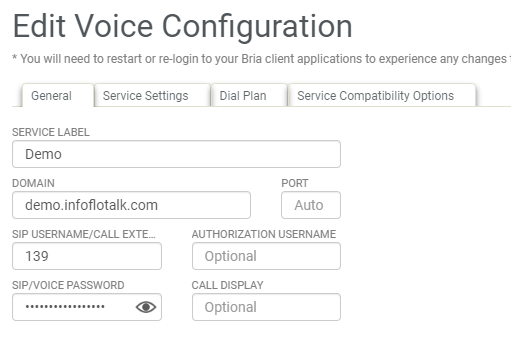
 - In the Genera tab:
- set SERVICE LABEL to “InfoFlo Talk” (” ” should be removed)
- set DOMAIN to InfoFloTalk host name as provided in the intro email
- set SIP USERNAME/CALL EXTE… to your extension in InfoFlo Talk. Note that the initial extension was pre-configured in InfoFloTalk and sent in the intro email.
- set SIP/VOICE PASSWORD to the password set for the extension defined above. Note that the password for the initial extension was sent in the intro email. Again, we want to stress the importance of changing this password after initial portal login.
- Save the config by clicking the Save and Close button. All other fields should be left as default values.
- For Bria Solo Config will look like
Share