Auto Attendant
Search Knowledge Base by Keyword
Creating an Auto Attendant
IVR (Interactive Voice Response) or Auto Attendant systems are used to play a recording and then prompt the calling party with a collection of menus/sub menus. For instance “press 1 for support, 2 for sales, press 3 for general mailbox” etc.. IVRs can be nested where pressing an option on the main menu can route the call to another sub menu with its own collection of options. sub menus are a great way to reduce the number of main menu options as too many option might become confusing to the caller. Please refer back to our script examples and tips and tricks articles to get started.
To create a new IVR click on the ![]() button and then click on the “add IVR” link from the right. Existing IVRs can be edited by selecting an item from the list on the right.
button and then click on the “add IVR” link from the right. Existing IVRs can be edited by selecting an item from the list on the right.
IVR Options Explained
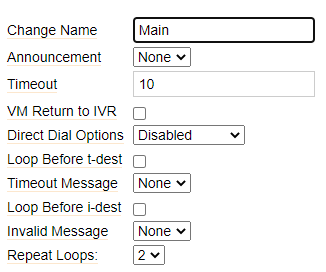
Change Name – A new IVR will be auto named as “Unnamed”. Use this field to change its name to a more descriptive name.
Announcement – System recording to be played back to the caller prior to calling the ring group.
Timeout – time before timeout condition is reached. t-dest below.
VM Return to IVR – Return caller to IVR if reaching a user’s voice mail.
Direct Dial Options (Default is Disabled) – Allow the caller to direct dial extensions while navigating the auto attendant. The reachable extensions can also be limited to a specific company directory. This is very useful for auto attendants with multiple sub menus.
Timeout Message – Recording to play if Timeout expires before caller makes a selection
Invalid Message – Recording to play if caller makes a selection not in the IVR menu
IVR Menu Setup
When setting up a new IVR the default menu will look like this:
![]()
The left column is used to enter the menu option and the second column is for selecting a destination to be triggered. The destination can be anything already configured such as a extension, ring group, queue, nested IVR, an announcement, etc.. For instance, for enabling an option to dial 0 to reach the operator would look like this:
![]()
Where 0 is the menu option and Ring Group “Operator” is the destination.
Advanced Options
There are 2 advanced options that can be configured in an IVR, what to do if the timer defined in the timeout field expires and what to do if the caller enters an invalid destination. The default setup is to play the recordings defined but these can be overridden for more advanced workflow.
t – destination if timeout expires – override default timeout message with another destination such as an IVR, queue, ring group, extension, etc.. The example below will send the call to rin
![]()
i – destination if invalid extension entered – override default invalid message with another destination
Loop before t-dest – loop Y number of times back to the IVR main menu (where Y is defined in Repeat Loops) when timeout expires before proceeding to t destination defined above. Default value id unchecked.
Loop before i-dest – loop Y number of times back to the IVR main menu (where Y is defined in Repeat Loops) when invalid extension entered before proceeding to i destination defined above. Default value id unchecked.
t-dest and i-dest are mutually exclusive options so they can be defined individually.
The ![]() setting on the menu will override the destination and send the call back to the parent IVR. This option is helpful with nested IVRs
setting on the menu will override the destination and send the call back to the parent IVR. This option is helpful with nested IVRs