Extensions
Search Knowledge Base by Keyword
Creating An Extension
Click on the extensions button ![]() , make sure Generic SIP Device is selected from the drop down and click the submit button. All the fields on this form have context sensitive help so simply hover over the label to get more details. There are alot of advanced settings here that can be tweaked so we will just stick to the basics at this time. Below are the minimal fields required to setup the extension. Bubble help is available simply by hovering over the setting name. Existing extensions can be edited by selecting from the list on the right.
, make sure Generic SIP Device is selected from the drop down and click the submit button. All the fields on this form have context sensitive help so simply hover over the label to get more details. There are alot of advanced settings here that can be tweaked so we will just stick to the basics at this time. Below are the minimal fields required to setup the extension. Bubble help is available simply by hovering over the setting name. Existing extensions can be edited by selecting from the list on the right.
Basic Required Fields
- User Extension – Enter any value for the extension number of the user (we usually recommend to start with extension 101)
- Display Name – The first and last name of the user of this extension
- SIP Alias – Same value as was entered in the user extension field above
- Outbound CID – Caller ID to be displayed on the receiver end when making an outbound call from this extension. The value has to be in the following format “NAME” <NUMBER>. For example “InfoFlo Solutions” <4162234353>. Make sure the NAME is not long and that there are no dashes or brackets in the NUMBER. Keep in mind that every extension can have a different outbound caller ID so this is really useful if each user has a direct dial inbound number. This value is required for North American customers (as per STIR/SHAKEN FCC Compliance guidelines in the US and Canada). This callerId will be used for 911 calls being placed from the extension.
- secret – This is the password to be used both to register a phone to this extension as well as to login to the InfoFloTalk portal. It is considered good practice to utilize strong passwords here. We recommend a minimum of 16 characters consisting of a combination of numbers, lowercase letters, uppercase letters and symbols. Its best to use a site such as here that will auto generate random password. Below is a screen shot of what generator options will look like.
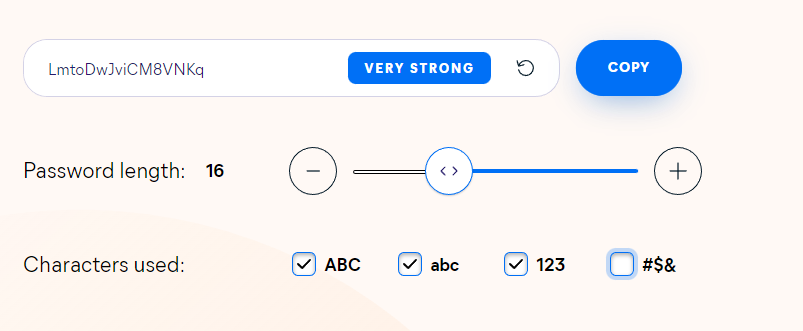
- Please note that accepted symbols are @,$,!,%,*,?,&. Please replace any symbols that don’t match this collection with one that does. This strong password can be auto-saved by the browser as well as by the phone so the user does not need keep a record of this password.
- nat – make sure this option is set to YES.
- Record Incoming – set to either Always or Never. Setting this to always will record every incoming call to this extension.
- Record Outgoing– set to either Always or Never. Setting this to always will record every outgoing call from this extension.
The Voicemail & Directory section of the extension form is used to optionally setup voicemail on the current extension. Please see image below for fields required for enabling this option.
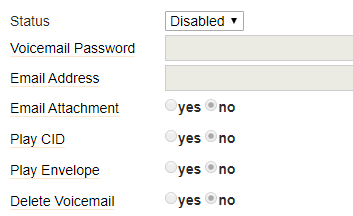
Simply, make sure Status is set to enable, enter the extension number as the voicemail password (strong password is not required here), enter the user’s email address in the email address field for voicemail delivery via email, and optionally set email attachment to yes to force the voicemail to be attached to the email. Enable Play CID to play the callerID prior to listening to the message. Enable Play Envelope to play the date/time when VM was left prior to listening to the message. Enable Delete Voicemail to delete the message after its been sent as an email.
Advanced Fields – explained
- CID Num Alias – The CID Number to use for internal calls, if different from the extension number. This is used to masquerade as a different user. A common example is a team of support people who would like their internal CallerID to display the general support number (a ringgroup or queue). There will be no effect on external calls.
- Ring Time – Number of seconds to ring prior to going to voicemail. Default will use the value set in the General Tab. If no voicemail is configured this will be ignored.
- Call Forward Ring Time – Number of seconds to ring during a Call Forward, Call Forward Busy or Call Forward Unavailable call prior to continuing to voicemail or specified destination. Setting to Always will not return, it will just continue to ring. Default will use the current Ring Time. If voicemail is disabled and their is not destination specified, it will be forced into Always mode.
- Call Waiting – Set the initial/current Call Waiting state for this user’s extension.
- Call Screening – Call Screening requires external callers to say their name, which will be played back to the user and allow the user to accept or reject the call. Screening with memory only verifies a caller for their CallerID once. Screening without memory always requires a caller to say their name. Either mode will always announce the caller based on the last introduction saved with that CallerID. If any user on the system uses the memory option, when that user is called, the caller will be required to re-introduce themselves and all users on the system will have that new introduction associated with the caller’s CallerID. To enable from ring group add a # after extensions setup as destinations.
- Queue State Detection – If this extension is part of a Queue then the Queue will attempt to use the user’s extension state or device state information when determining if this queue member should be called. Default value should always be left as “Use State”.
- DID Description – Used when the extension has its own direct number. A description for this DID, such as “Support Line”.
- Add Inbound DID – A direct number that is associated with this extension. The number should be in the same format as provided by the provider (e.g. full number).
- Add Inbound CID – Add a Caller ID for more specific DID + CID routing. A DID must be specified in the above Add DID box. In addition to standard dial sequences, you can also put Private, Blocked, Unknown, Restricted, Anonymous and Unavailable in order to catch these special cases if the Telco transmits them.
Call Routing section – explained
This section is for configuring the call workflow for how the call will be routed when its not picked up, the user is on the phone or the extension is not reachable. The default config for each of these events is to route the call to voicemail if its enabled.
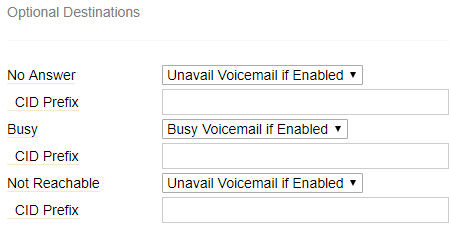
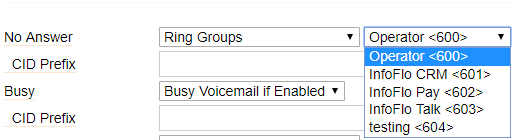
Clicking on the pull down list the call can be routed to any other configured destination such as another users voicemail, another users extension, a ring group, a queue, a conference, an IVR etc… Once a configured destination type is selected from the pull down list, another pull down list will appear on the right to select the final destination. Below is an example of a call workflow where the call is routed to the operator ring group if the call is not picked up withing the allotted ring time.
Saving the config
Press the ![]() button at the very bottom to save changes, and then click on the
button at the very bottom to save changes, and then click on the ![]() to have the changes take affect immediately.
to have the changes take affect immediately.
Repeat this process for all other extensions. to edit an extension, select the extension from the list on the right and don’t forget to save changes when done.