Setting up a Polycom SoundPoint 550
Search Knowledge Base by Keyword
Step 1: reset to factory default
- please turn over the phone and take a picture of the ID string. It should start with 0004 and is located right above the bar code.
- connect the phone to the network and press press the cancel button (last from right) when application begins to load
- during the countdown process press and hold 4, 6, 8, and * dial pad keys. Note: key combination might be different for your phone model please see Polycom kb for more details (scroll down to the paragraph starting with “Option 3 via the Multiple Key combinations” and search for your phone model number)
- This will bring up the enter password prompt
- Enter the ID string from the picture from first step. Please note the 1->Aa button. This is used to toggle between numbers, caps and lower case. See example below
- Here are the exact keystrokes to reset a phone with an example MAC Address of 00-04-F2-AA-81-4C
Character Actions 0 Press the ‘0’ key once 0 Press the ‘0’ key once 0 Press the ‘0’ key once 4 Press the ‘4’ key once f Select the input modifier once to toggle into lower case letter mode Press the ‘3’ key three times quickly 2 Select the input modifier twice to toggle back into numeric mode Press the ‘2’ key once a Select the input modifier once to toggle into lower case letter mode Press the ‘2’ key once Wait for two seconds for the blinking cursor to return a Press the ‘2’ key once 8 Select the input modifier twice to toggle back into numeric mode Press the ‘8’ key once 1 Press the ‘1’ key once 4 Press the ‘4’ key once c Select the input modifier once to toggle into lower case letter mode Press the ‘2’ key three times quickly - Press OK
- If String ID entered properly a message will display that config has been reset
- The phone will reboot
- press the cancel button (last from right) when application begins to load
- select setup
- enter 456 when prompted for the password.
- use the arrow button to the right of the screen to navigate to Server Menu and click the checkbox button
- verify the server type field is set to FTP
- please send an email to support@infoflosolutions.com to obtain the IP address, Username and password
- use the arrow keys to navigate to the server address field, press the checkbox button and enter IP Address. Make sure left most button is set to 1->Aa
- verify the server user field is set to Username
- use the arrow keys to navigate to the server password field, enter password as provided
- Click button labled Exit and save & reboot phone
- Phone will now go through a series of updates which will display on the screen
- When all updates are complete the time should be flashing in the middle of the screen.
Step 2: upgrade phone to latest software from Polycom
- Obtain the phone’s IP address by clicking on the menu button (right of keypad), then selecting network from the screen using the arrow keys and then TCP/IP parameters.
- Using a browser, navigate to the phone’s config using https://IP_ADDRESS_OF_PHONE (notice the https). Browser will display a security warning, which can be ignored and proceed to the url.
- Login as Admin with password 456
- From the Utilities menu select Software Upgrade
- Click ‘Check for Updates’ button
- select the latest version in green at the bottom of the list
- Click the ‘Install’ button
- the phone will reboot

Step 2: Setup dialing rules for the phone, also know as Digitmap
Polycom defines a digitmap as the dialing rules which are allowed for outbound dialing from the device. The default factory settings will not allow direct dialing/transferring to extensions starting with 1.
- log back into the phone’s config as above
- From the settings menu select SIP
- In the digitmap text box remove the existing string and replace with ‘[2-9]11|0T|011xxx.T|[0-1][2-9]xxxxxxxxx|[2-9]xxxxxxxxx|[2-9]xxxT|**x.T|+x.T|[1-8]xxT’. only copy the string between ” marks.
- In the Digitmap Teimout field remove the existing string ans replace with ‘3|3|3|3|3|3|3|3’. Again, only copy the string between ” marks.
- Leave all other fields unchanged
- Note that the fields changed will require a phone reboot
- Click the ‘Save button’ which will restart the phone.
Step 3: Set Date & Time
- From the preferences menu select Date & Time
- Under the ‘display format’ section setup as needed
- Under the ‘Time Synchronization’ set ‘Use TCP SNTP Server’ to ‘Yes’
- Set ‘TCP SNTP Server’ & SNTP Server to one of the drop down options per field.
- Set ‘TCP Time Zone’ and ‘Time Zone’ to one of the drop down options per field.
- Under the ‘Daylight Savings’ section setup as needed
- Click save
- The time display on the phone will stop blinking and will be set to configured settings.
Step 4: Setup Extension on InfoFlo Talk
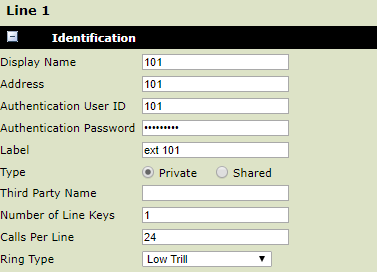
- From Settings menu select Lines
- Identification section should be filled out as per example below. Note that 101 represents the users extension as assigned by InfoFlo Talk. ‘Authentication Password’ field must be the strong password setup in the given extension. The ‘Label’ field will be what is displayed on the phone as line 1. Keep this label short to make sure its fully displayed.
- Server 1 sections should be filled out as example below. Note that customer.infofloftalk.com is the InfoFlo Talk host name as supplied to InfoFlo Talk admin.
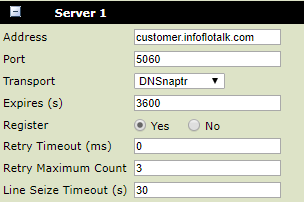
- All other options should remain unchanged
- Click ‘Save’ button.
- The extension will register and extension label will be displayed on top left of phone interface.
Share