Setting up a Yealink T21 phone
Search Knowledge Base by Keyword
nfoFloTalk supports any and all VoIP devices as long as they are SIP compatible. Analog phones can also be used but they require an additional piece of hardware called an ATA adapter. Customers with existing VoIP phones coming over from other carriers such as RingCentral, Vonage, 8×8, etc… need to make sure the devices are not locked by the current provider.
The config example below uses a Yealink T21P device with 2 lines.
Step 1: Find the IP address of the phone using the menu system of the device itself. This varies from phone to phone depending on the brand. A quick google search will return the steps required. Its usually a couple of clicks away for instance on the Yealink its menu -> status.
Step 2: connect to the web config of the phone using a browser by pointing your browser to http://PHONE_IP or https://PHONE_IP where PHONE_IP is the ip address of the phone from step 1.
Step 3: reset the phone to factory settings. This step is not needed if the phone is new. It is important if the device was previously registered with another carrier.
Step 4: register using the extension number and secret from the extension setup step above. The host name to be used will be sent in the welcome email. The host name will be in the form of CUSTOMER_NAME.infoflotalk.com, where CUSTOMER_NAME is the the company/organization name that signed up for the service.
The account setup page looks like the image below on the Yealink phone. The Label, Display Name, Register Name, are normally set to the extension number. These values are used internally by the phone to display data such as the value to be displayed on the phone interface. The User Name must be set to the extension number setup in InfoFloTalk. This value is used to authenticate the user when the phone is attempting to register with the system. Same for the Password field, this should be copied and pasted from the InfoFloTalk admin interface to make sure the values match. The Server Host is the InfoFloTalk hostname as provided in the intro email. The host name will be in the form of CUSTOMER_NAME.infoflotalk.com, where CUSTOMER_NAME is the the company/organization name that signed up for the service. The Port should be left with its default value of 5060. The Transport should be left with its default value of UDP.
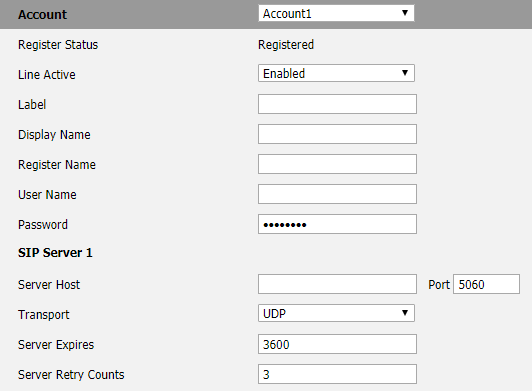
When the phone successfully registers the Register Status with change to Registered. Also, the extension will show up as green in the status tab of InfoFloTalk when clicking on the Status button from the main menu.
These options will be a little be different depending on the hardware. We are happy to try and help with any issues related to phone registration, we know this step can sometimes be a bit frustrating. Assistance with up to 2 phones is free of charge.
For any other questions or technical queries please email our support team at: support@infoflotalk.com