Projects
Search Knowledge Base by Keyword
Projects can be created an viewed by any user with permissions level higher than contributor. Below is a summary of project specific features which can be accesses from the projects menu on the left:
Configure – Template configuration for the default sub tasks to be automatically generated when a new project is created. Sub tasks are independent of each other so they can all be worked on in parallel. Sub task titles, default assignee and expected completion offset in days to backfill task due dates based on production date (defined in linked project) can be changed using the interface provided. Tasks can also be added and removed as needed. Changes to the template will reflect in new projects created using this base config, existing projects will remain unchanged. We have already pre-populated the project template with all the tasks from the Excel sheet provided. The + sign on the top right can be used to add more sub tasks to the template.

Attributes – The custom attributes designer is used to modify the existing collection of custom fields making up the project form. New custom fields can be created by selecting an attribute type from the pull down list on the top of the designer. There are many types to choose from such as text, number, pull down lists, etc… Every custom field includes a properties designer page where specific field related attributes can be set. For instance, a field marked as required will be needed to have a proper value before the project can be created. Fields marked as listable will automatically displayed on the project list view (see below). Here is an example of the Client field properties editor of the project form.
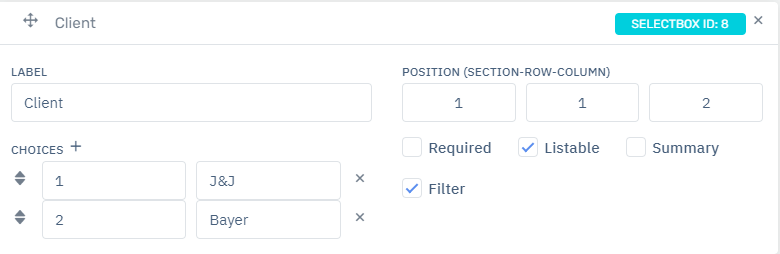
Layout – The layout manager designer is used to build custom sections within the form where the custom attributes defined above can be placed. Each section is defined as a table made up of rows and columns. Each cell within this table can be filled with a custom field defined in the attribute designer. As can be seen in the screen shot above, the Client field is places in Row 1, Column 2 of the advanced section (section 1)
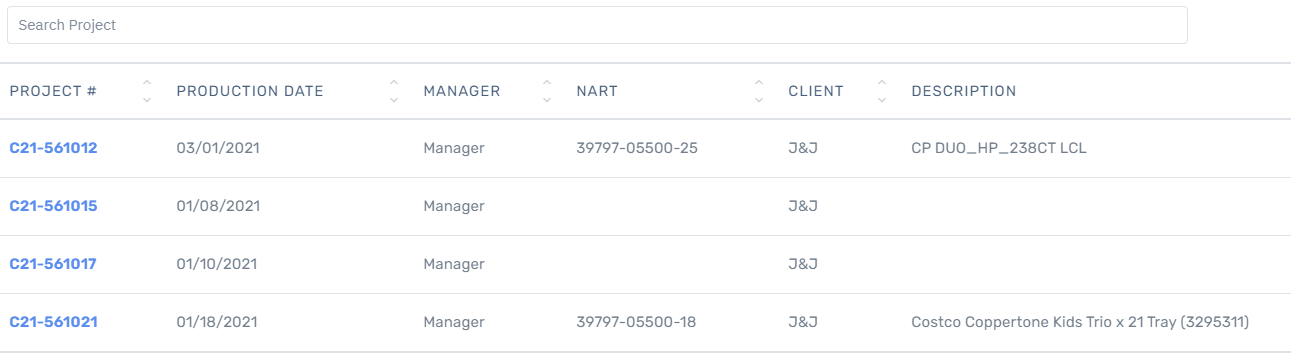
List – The list view will display a table view of all projects. The columns of the view are a combination of the base fields defined for a project and all the custom fields tagged as listable in the attribute designer. Any additional fields marked as listable, will automatically show on the list view. Below is a screen shot showing the project view with the custom fields Client defined above as listable. Any sortable column will show arrows pointing up and down next to the column header.
The filter button ![]() is used to display all the columns by which the table can be filtered as per the filterable property of the fields defined in the attribute designer.
is used to display all the columns by which the table can be filtered as per the filterable property of the fields defined in the attribute designer.
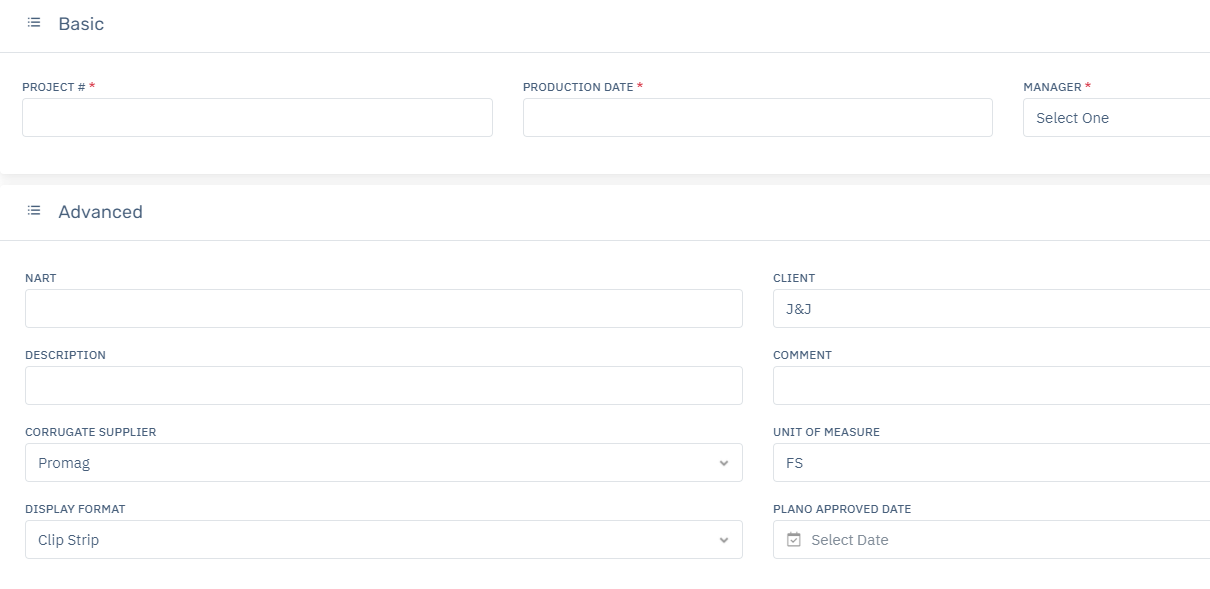
The create project button ![]() will display the new project form were new project details can be entered. Fields denoted by a * are required. The tasks tab
will display the new project form were new project details can be entered. Fields denoted by a * are required. The tasks tab ![]() will show all the sub-tasks to be created for this project as per the project template. The manager creating the projects is able to modify task assignments and override expected completion dates. If values are not assigned here then assignee and expected completion will inherit the base values from the template. Note that task assignment is on a per user basis, so a task can be assigned to a single user only.
will show all the sub-tasks to be created for this project as per the project template. The manager creating the projects is able to modify task assignments and override expected completion dates. If values are not assigned here then assignee and expected completion will inherit the base values from the template. Note that task assignment is on a per user basis, so a task can be assigned to a single user only.
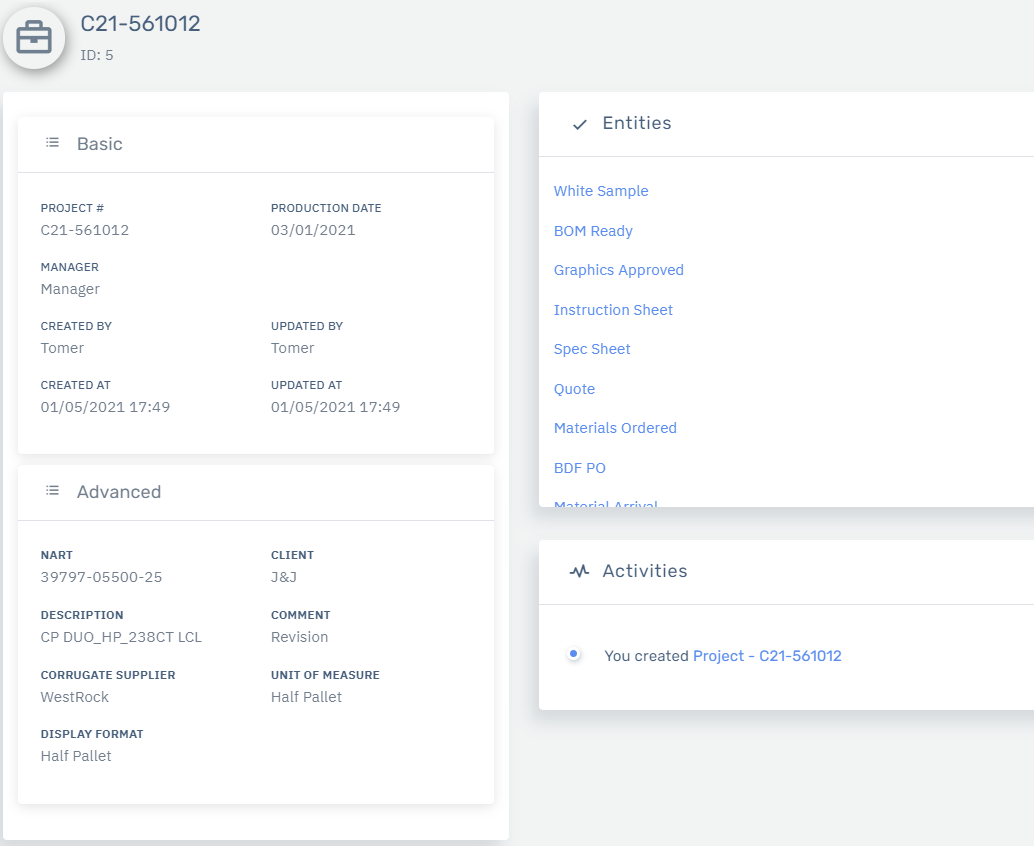
Quick viewer – quick viewer is a dashboard based view into a project. All the project form fields are displayed on the left divided into two section, Basic and Advanced. The Basic section are all the base fields such as project # & production date. The Advanced section (defined in the layout manager discussed above) incudes all the custom fields which have been dynamically added by the attribute designer. The right side of the view will show all related tasks, notes, etc that have been linked to this project. The template based tasks are automatically linked, while other items such as notes can be linked at any time. See linking article for more info. There is also an activities section that will show an audit trail of all the other users who have modified this project along the way. The Edit button on the top right allows direct editing of the project form instance.
The project can be edited by clicking the edit action from list view or the edit button from the quick viewer. Modifying the production date of a project will auto adjust dependent backfilled fields. Overridden fields will not be changed.
Project Tracker – The tracker is the visual representation of all tasks linked to a project and the status of each. Green indicates the task is completed, orange indicates the task is in progress where its not yet completed but there is still time until the due date, red indicates the task is stuck where it is not completed and the due date has passed. Here is how the project tracker will look visually.
![]()